OpenSIPs in the DMZ
You’ve got your brand new broadcast IP codec. A pair of them really, one inside the network and the other outside. How do you make them talk to each other?
Admittedly, it could be as simple as port forwarding or using the manufacturer’s NAT-busting service. But what happens when you get to multiple codecs on multiple geographically distributed sites?
Hopefully your shiny new IP codecs are N/ACIP compliant. That means we can use an “off the shelf” SIP server to sit in both the DMZ (“public facing”) and your internal network.
It’s setting this up with OpenSIPs that I’m going to talk you through.
However, I’ll be upfront with you – there’s a few catches. We’ll not be talking through making the system resilient. It’s possible to configure “clusters” for OpenSIPs with some home-grown scripts throwing around virtual IP addresses. That’s a bit beyond what we’re aiming to cover here.
Secondly, we won’t be covering system updates, firewalls, etc. too closely. You’ll need to use your professional judgement when it comes to exposing systems to the Internet.
We will skip over a number of topics that aren’t directly related to the OpenSIPs configuration. That said, IP Tables, Fail2Ban, Logcheck and even basic IP routing are good things to look in to.
Anyway, let’s get cracking. The system we’re building will look something like this:
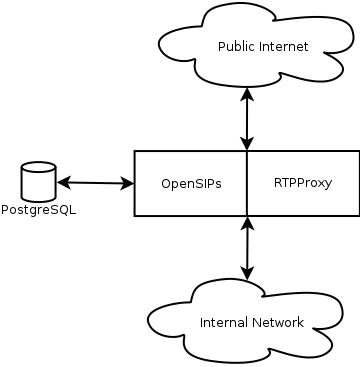
OpenSIPs will be providing the SIP service on both the public and private networks. RTPProxy will be used to route the audio between the two.
PostgreSQL is the database system we’ll be using to back OpenSIPs. All of the user accounts, active registrations and whatnot will be stored here.
To make this server configuration happen you’ll need a Linux system of your choice. I ended up going with Ubuntu as we make extensive use of it where I work. If you choose another distribution, some of the steps won’t quite match up.
From a networks viewpoint, you’ll need to configure your NICs with appropriate IP addresses for which network they’re on. Only one of the NICs should have a default gateway on it.
Also, you may need to set up a static route to the rest of your network on one of the interfaces (e.g. 10.0.0.0/8 on the internal NIC) to allow access to the whole of your internal network.
Once we’ve got the network side sorted, let’s continue on by installing PostgreSQL. The initial install can be triggered by running the following as root :
apt-get install postgres
That’ll install the software but there’s a little more configuration needed. Let’s start by changing the postgres user password. To do this, enter the following commands as root:
su postgres
psql postgres
\password postgres
You’ll then be asked for a password. Pick a strong one but make a note of it as you’ll need it for the OpenSIPs installation.
By default, OpenSIPs likely won’t appear in your operating system’s software repository. To add the OpenSIPs repository in Ubuntu, add the following line to /etc/apt/sources.list
deb http://apt.opensips.org/ stable110 main
Before the repository will work, you’ll need to import their public key. To do this, enter the following commands as root:
wget http://apt.opensips.org/key.asc
apt-key add key.asc
apt-get update
It’ll now be possible for you to install OpenSIPs. To trigger this, run the following command as root:
apt-get install opensips opensips-postgres-module opensips-console rtpproxy
Assuming everything went as expected, you’ll have a freshly installed copy of OpenSIPs. Catch is that it won’t have a configuration or a database.
Best place to start here is configuring the database. You’ll want to make sure that /etc/opensips/opensipsctlrc has the following contents:
SIP_DOMAIN=obsip.example.com
DBENGINE=PGSQL
DBNAME=opensips
DBRWUSER=opensips
DBRWPW=”SuperSecretPassword”
obsip.example.com should be replaced with the name of the system you’ll be installing this on. This works best if it’s a publicly resolvable FQDN.
Now that the database is configured, you can tell OpenSIPs to create the basic database structure by running the following command:
opensipsdbctl create
You’ll be asked for the PostgreSQL password we created when we setup the database. Several times in fact. It gets somewhat repetitive.
Thankfully you only have to follow this process once. And when it’s done, we’re ready to pull in the OpenSIPs configuration file.
I’ve attached an already written configuration file to this article. You’ll need to download it from here, make some customisations and save it to /etc/opensips/opensips.cfg
There are several parts of the PostgreSQL configuration where you’ll need to change the password to match your system. A quick find-and-replace should do the trick here.
You’ll also need to change obsip.example.com to match your FQDN for the service.
All instances of 10.1.1.1 should be replaced with the private IP address of the server. Similarly,192.168.2.2 should be replaced with the public IP address of the server.
This should be enough to get your OpenSIPs server up and running. However, there’s a bit of logic that you’ll probably need to look at.
Specifically, it’s the bit that tells RTPProxy how to behave. It detects whether the connection is internal to internal, internal to external, external to internal or external to external. This is done so that we can offer the correct IP address for the codecs to send audio to.
The logic in the example file looks something like this:
route[relay] {
# for INVITEs enable some additional helper routes
if (is_method("INVITE")) {
# Resolve the user's location
lookup("location");
xlog("Resolved destination to $ru");
# Work out which side of the line we're on
if (dst_ip == 192.168.2.2) {
# We're external. See if we're contacting someone on the inside or outside.
if (!($ru =~ "sip:.*@10[.].*")) {
log(1, "External to External");
rtpproxy_offer("EE");
} else {
log(1, "External to Internal");
rtpproxy_offer("EI");
}
} else if (dst_ip == 10.1.1.1) {
# We're internal. See if we're contacting someone on the inside our outside.
if (!($ru =~ "sip:.*@10[.].*")) {
log(1, "Internal to External");
rtpproxy_offer("IE");
} else {
log(1, "Internal to Internal");
rtpproxy_offer("II");
}
}
if (isflagset(NAT)) {
#rtpproxy_offer("ro");
}
t_on_branch("per_branch_ops");
t_on_reply("handle_nat");
t_on_failure("missed_call");
}
if (isflagset(NAT)) {
add_rr_param(";nat=yes");
}
if (!t_relay()) {
send_reply("500","Internal Error");
};
exit;
}
As you can see, some of this logic relies on knowing that internal IP addresses start with 10.x.x.x. You’ll need to edit the regular expressions to match your network configuration.
Once all of these changes are made, you’re almost ready to fire up OpenSIPs. However, RTPProxy still needs some work.
Thankfully, it’s a one liner. To launch RTPProxy in the correct arrangement, run the follow command (potentially as root):
sudo -u rtpproxy rtpproxy -l 10.1.1.1/192.168.2.2-s udp:127.0.0.1:12222
Again, you’ll need to adjust the IP addresses to match your configuration. To make RTPProxy fire up on boot, I’d recommend sticking this in your /etc/rc.local file.
And now we can finally launch the OpenSIPs service. That should be as simple as running the following command as root:
service opensips start
Assuming it’s all configured correctly, OpenSIPs will launch and straddle both networks it’s connected to. If something goes wrong, check out /var/log/syslog for hints.
It’s been a long journey so far but we really are very close to the finishing line. You’ll need to create some user accounts to allow the codecs to connect to the server. That’s as simple running the following command:
opensipsctl add username password
And that really is it. You should have an OpenSIPs server straddling between your internal and external networks.
I’ll admit that we’ve only really skimmed over the configuration and skipped past a few topics related to this process (e.g. networking, security, etc.). However, with a bit of knowledge in these areas, some problem solving skills and a bit of time, it should be easy enough to configure your own server.