Protecting that Web Stream with QoS on Cisco ADSL Routers
If you’ve got a broadcast critical web stream to worry about, prioritising it ahead of all other web traffic is an important job. I’ve seen a number of approaches to it over the years.
The simplest of these was a second ADSL line dedicated to streaming. While this did sufficiently protect the streams, it seemed a costly and wasteful approach for just one stream. Though, I can see the benefit if multiple streams were involved.
Another approach is to use QoS to prioritise the streaming traffic. This effectively carves a chunk of your bandwidth out for the stream(s) and nothing else.
It’s worth noting that you can only really apply QoS in the outbound direction. You have no control over what comes inbound or how your packets are handled in the ISP’s network. While it does mean you’re at their whim, you can still provide an element of preference over the outbound traffic on your link.
With those limitations in mind, let’s look at configuring your router. In this article, we’ll be configuring an old Cisco router with an ADSL WIC and appropriate firmware installed. Both of these can be found for very little second hand if you want to try this yourself.
Anyway, let’s crack on with the configuration. I’ll assume you’ve got your router configured to “dial” (well, it is PPP) into your network provider. We’ll be using the Dialer 0 interface but you can adjust to match your configuration.
First step is to create an access list that will match your streaming traffic. In our case, we’re matching against a relay server that connects to a service on local port 8000. This results in the following:
ip access-list extended STREAMING_SERVER
permit tcp any eq 8000 host X.X.X.X
X.X.X.X is our relay server that will be pulling the stream. If you’re pushing the stream instead, your rule should look more like this:
ip access-list extended STREAMING_SERVER
permit tcp any host X.X.X.X eq 8000
You could also have multiple access list entries for multiple destinations. Either way, we’ve now got a way of matching the traffic we’re interested in.
The next step is to create a class-map for this traffic. This is what will be used by the actual QoS policy to map traffic into specific “classes”. While what we’re doing isn’t really QoS marking of packets (we’re controlling how things are queued instead – you need full end-to-end control for proper QoS), that’s what it’s designed for.
Either way, to create the class-map we need, configure the following on your router:
class-map match-all MATCH_STREAMING_SERVER
match access-group STREAMING_SERVER
While we’re only creating one class-map here, in the real world you’ll may need more. They’re a way of grouping traffic into “bins” which you’ll be treating differently (e.g. different bandwidth allocations).
Anyway, you will now need to create a policy-map. This is the actual QoS “policy” that will be used to allocate bandwidth. For our example, the simplest configuration is:
policy-map QoS_OUT
class MATCH_STREAMING_SERVER
priority 96
class class-default
fair-queue
What we’ve done in this configuration is carve out 96 kbps of our bandwidth limit for streaming traffic. This might seem odd when you find out that the stream in question is 64 kbps. You will need to provide a bit of overhead in any allocation you make.
For all other traffic, we’ve enabled the fair-queue option. This roughly translates to every flow gets equal access to the remaining bandwidth.
At this point, we’re almost at a stage where you can apply the policy to your outbound interface. If you were to do it right now, the router would likely complain about a lack of bandwidth.
This is because Cisco routers don’t tend to know the bandwidth of an ADSL circuit. We have to tell it what limit to work to.
This is where your own real world experience and knowledge comes in. You’ll need to find out the real world upload bandwidth of the circuit. It’s advised you underestimate the speed of the circuit a bit to allow for changing conditions.
Either way, to enable the policy on your router interface, you’ll need the following commands.
interface dialer 0
bandwidth 420
service-policy output QoS_OUT
The bandwidth is measured in kbps. Much like most other interfaces on a Cisco router.
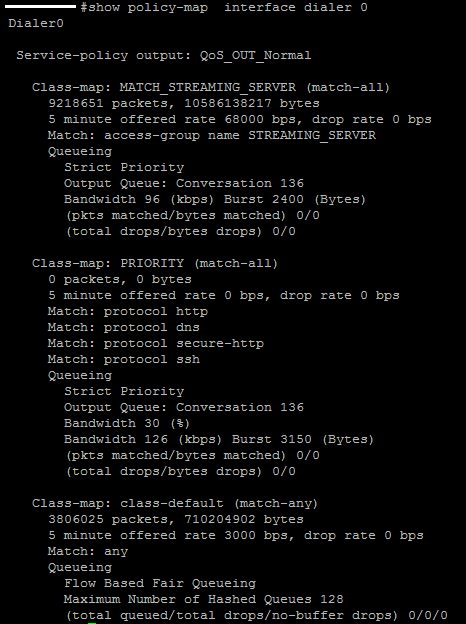
Checking the operation of the policy is as simple as running the show policy-map interface dialer 0 command. You’ll see the average bit-rates for each class-map over the last five minutes.
And that’s it. You’ll probably want a more complex configuration in reality but that should be enough to get you going.