Building a (Very) Low Power FM Transmitter with HackRF One
Software defined radio has been a thing for a few years now but the sheer cost of equipment meant put transmission out of reach. There’s even a post on this very site from a few years back where I used a USB dongle to download weather satellite images.
Transmitting was always the more interesting part to me. Yes, I did build one of those simple AM transmitters in an electronics kit. I never did get my amatuer radio licence, despite attending the local group for one session but I have had a bit of hands on experience with community radio stations and high density WiFi.
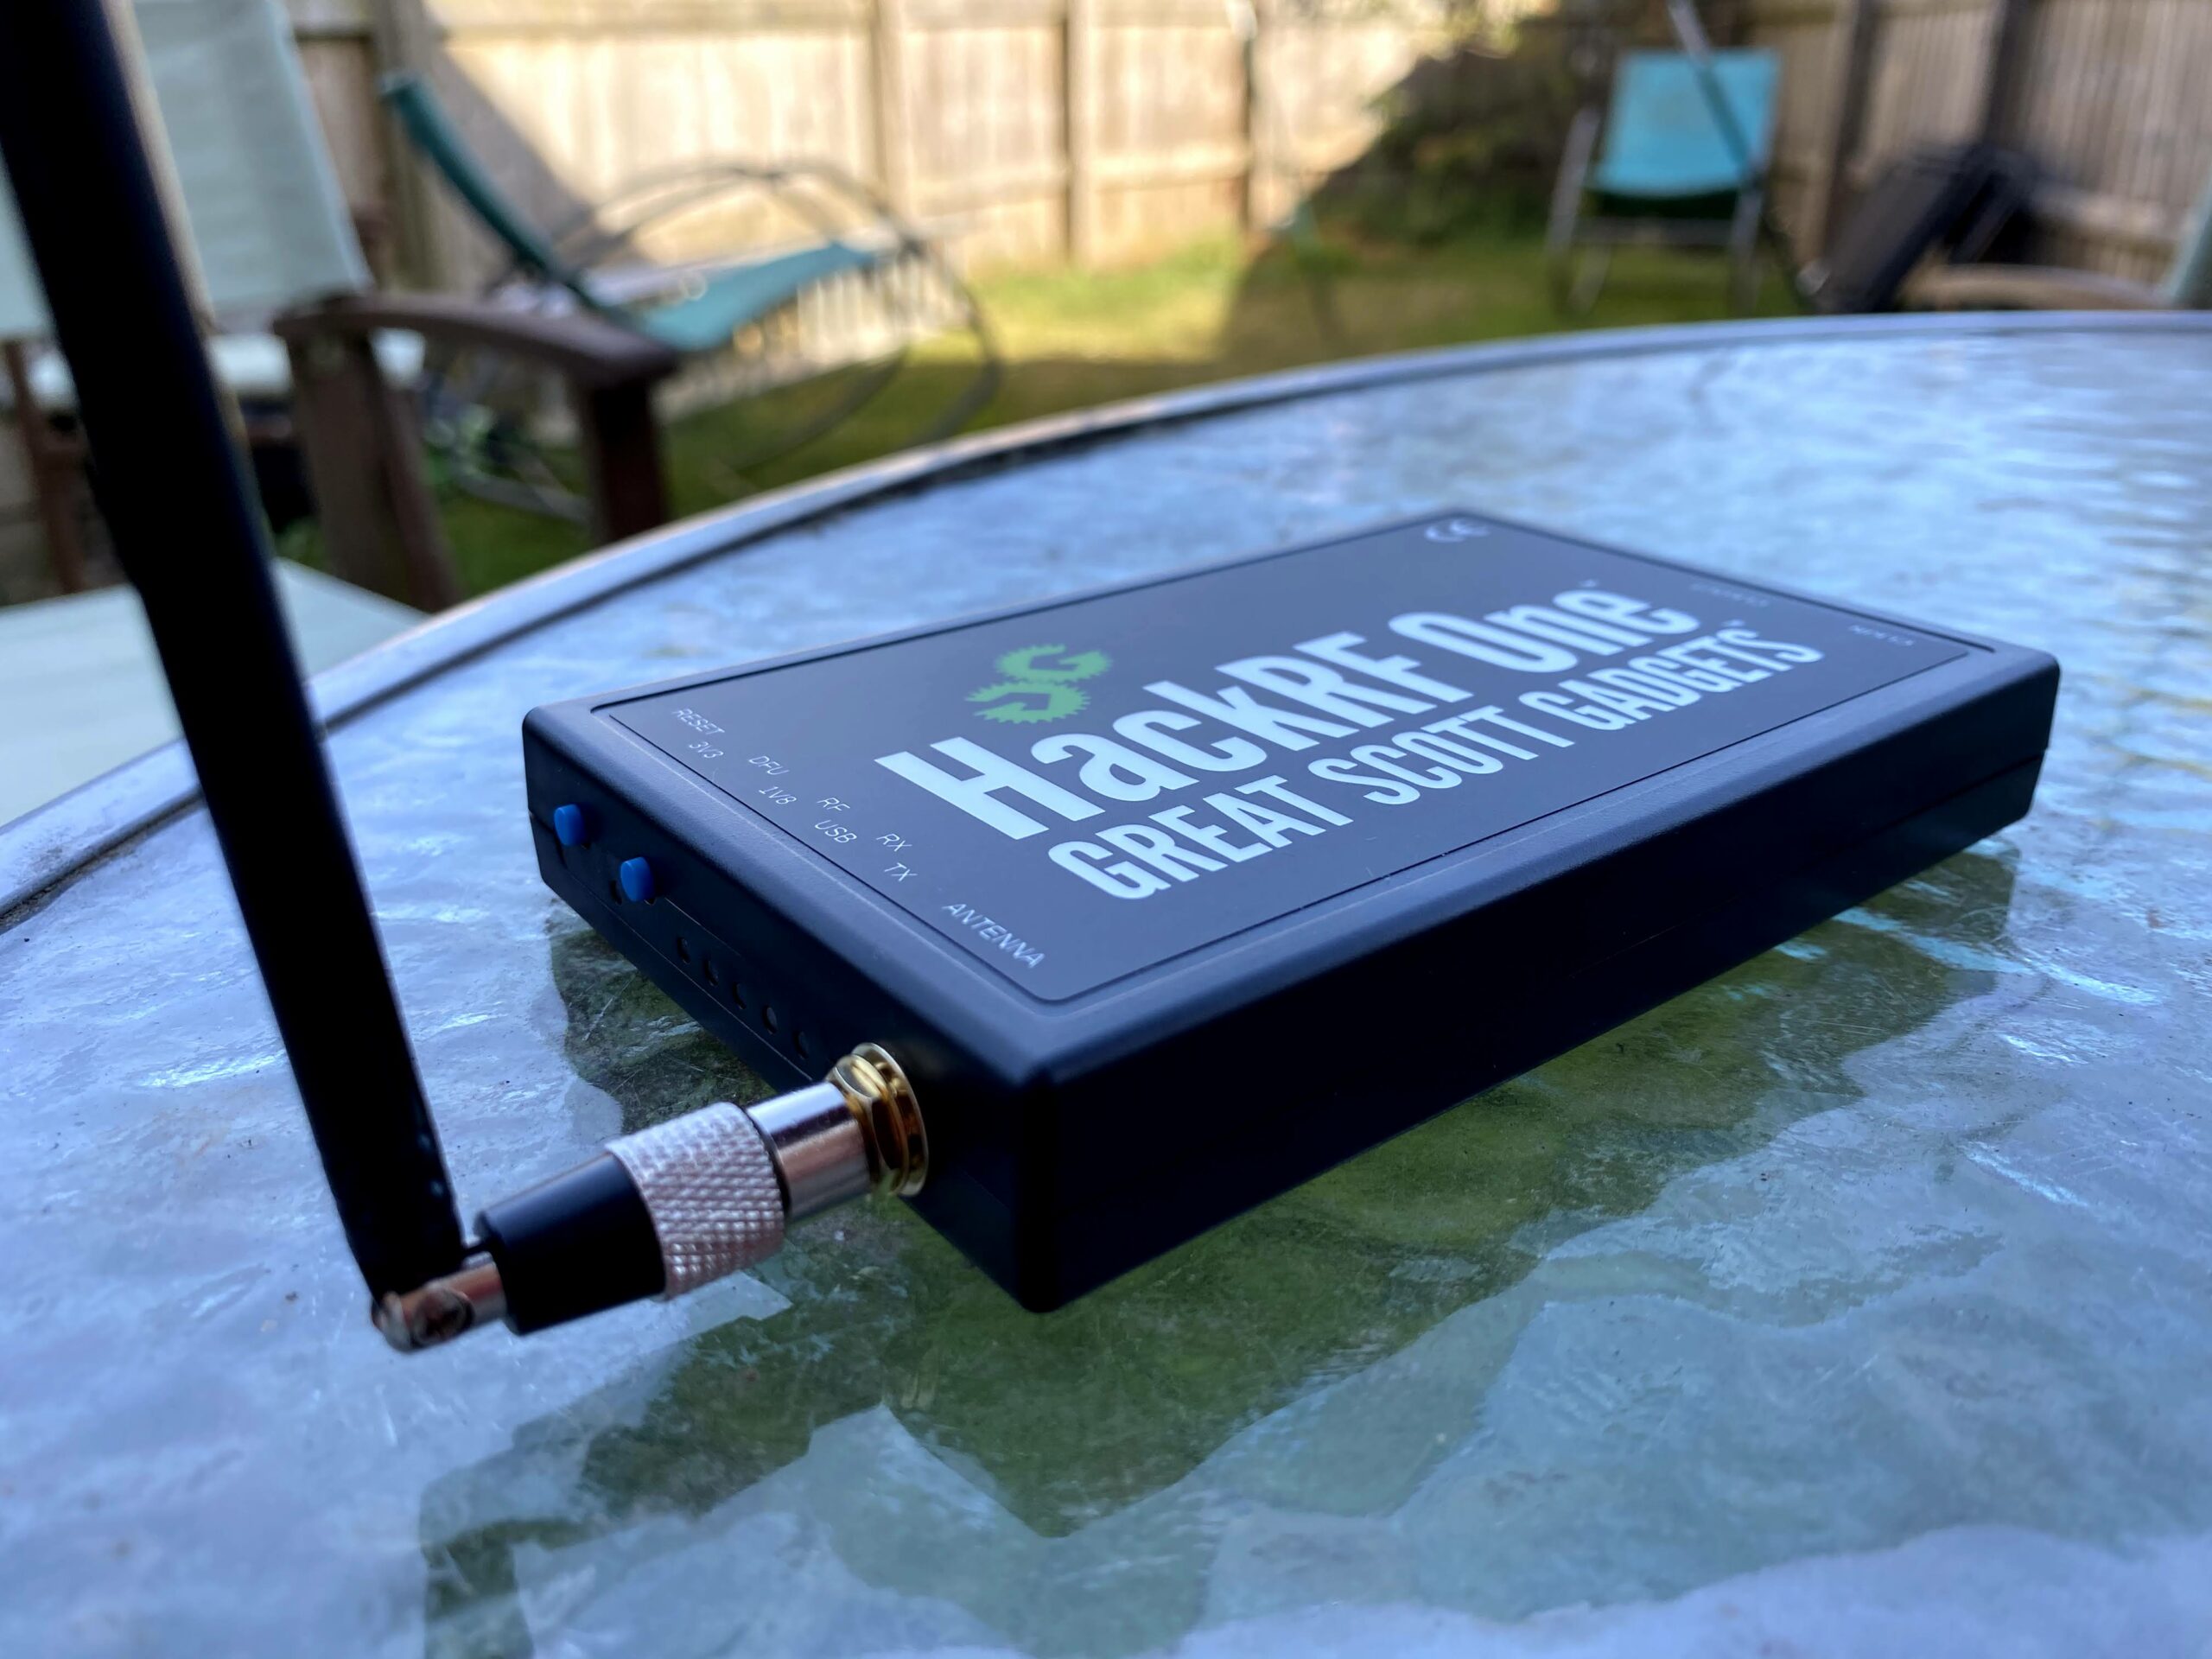
With prices having come down a bit in recent years, I’ve finally purchased a HackRF One.

The longer term ambitions include some digital (e.g. DAB), spectrum analysis and possibly even astronomy experiments but as a starting project, I set myself the goal of building a stereo FM transmitter using GNURadio.
My first mistake along the way was trying to run the HackRF One with a MacBook. While recieving worked well using the osmocom packaged reciever, transmitting was painful – it didn’t work. The pretty LED comes on and I get nothing but white noise from my trusty radio. This occured no matter what combination of GNURadio and HackRF packages I pulled from ports and brew.
The weird bit is hackrf_info seems to work and GNURadio claims it’s running correctly but I get digital noise at best out of the transmitter. It’s a bit of a shame really.
Back to the drawing board and this time I installed the software on an Ubuntu laptop. A bit of sudo apt install magic and we’re cooking with gas. We can finally take a look at the first FM transmitter chain I got working – a simple mono transmitter.
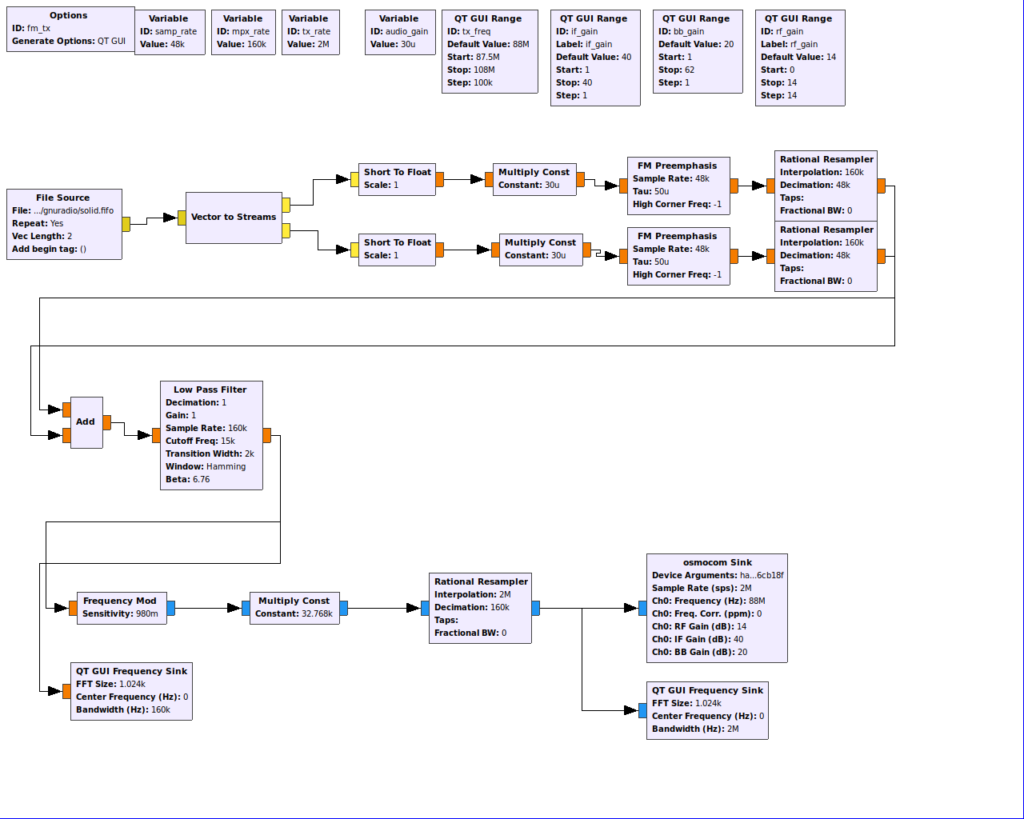
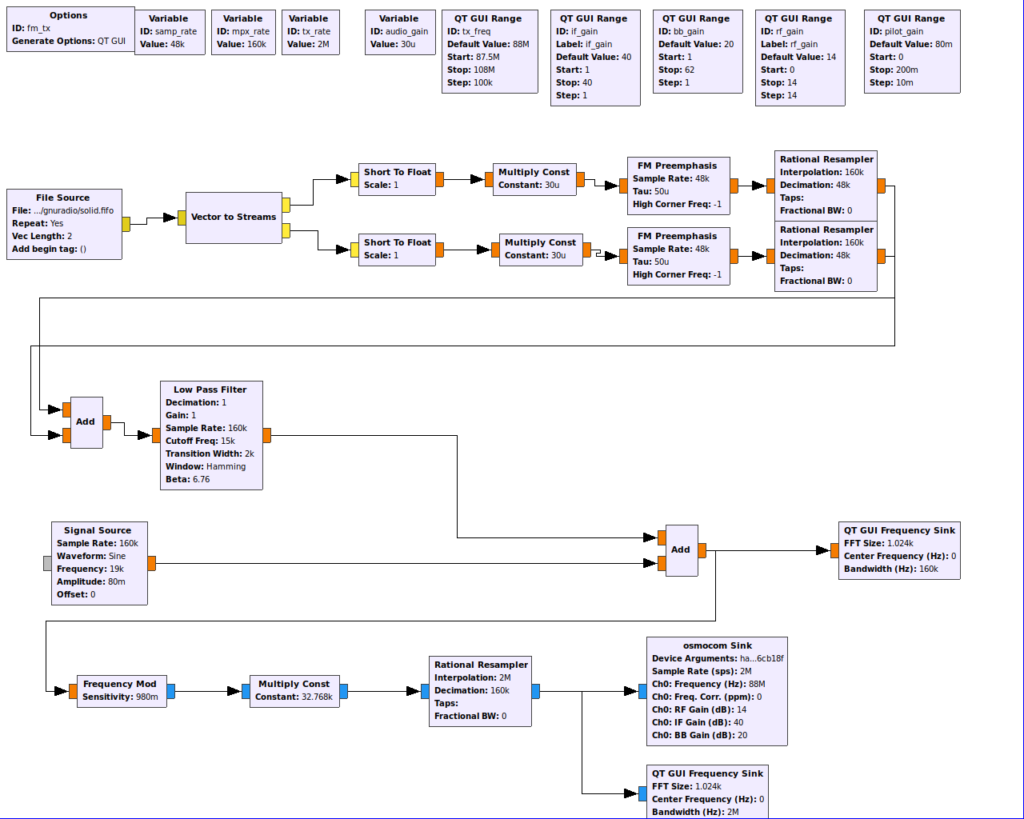
Straight off the bat, I’ll admit the diagram looks a little complicated. But let’s break it down and figure out what’s going on here. First place to look would be the audio input and processing chain.

It all starts with a file source. In our example, we pulled a stream from the Internet (Solid Radio, naturally) and wrote it to a First In First Out (FIFO) buffer. These are neat little buffers that appear like files allowing processes to stream data. If you want to try the transmitter graphs out for yourself, there’s a link at the bottom of this article but you’ll likely need to update the file source (double click and browse to the FIFO on your system).
To get some audio into it, we use the mpg123 program. If you need a copy, it’s available through apt (sudo apt install mpg123). Getting a stream into a fifo is as simple as running:
mpg123 -r48000 -s http://streaming.solidradio.co.uk/solidmp3 > solid.fifoNote that we’ve committed to a 48kHz sample rate. We can change this in the transmission chain through a variable you can double click on at the top of the graph but you need to make sure both the graph and mpg123 match. If not… well, I hope you enjoy Alvin and the Chipmonks or the Dark Lord through some unplanned pitch shifting.
With the file being read in as a bunch of short values, we need to split the stereo stream into left and right. Before the Vector to Streams stage, the audio samples are interlaced: [L],[R],[L],[R],[L],[R]. We tell GNURadio we’re wanting to split this into vectors with 1 sample in each spread across two streams.
With the streams now split into leaft and right, we can convert the samples to floating point numbers. It gives us a lot more freedom to amplify or attenuate values without fear of clipping. We could have done this earlier in the chain but there’s no harm waiting until this point to make the conversion.
Funny we mention attenuation as that’s exactly what the Multiply Const stage does. If we don’t attenuate, we’ll run too hot and distort the audio heavily. Now, admittely, the audio processor on the stream does this a bit already but we don’t want to add to the damage.
The next stage is the first specific to an FM transmitter – pre-emphasis. You might have come across this concept with your trusty old turntable currently acting as a dust platter. The aim it to amplify the higher frequency audio that’s more succeptable to loss. We’ve used the European standard of 50μS but you may need to adjust this to 75μS for the US.
Our final step in the audio pipeline is to upsample the audio to 160kHz. We need this higher sample rate for the multiplexing we’ll be doing when we complicate things adding stereo audio but there’s no harm in having this in place for the original mono transmitter.
This entire audio pipeline is something we won’t come back and change later. We’ve now got a left and right channel ready and raring to go.
For a mono transmitter, we need to turn a stereo signal into a mono signal. We do this by summing the left and right channels together.
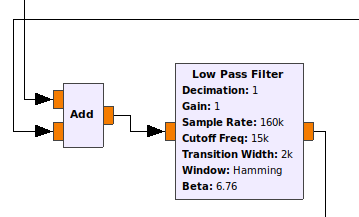
While we’re here, it’s worth pointing out the difference between mono and “one legged” audio. Mono in this case is a mix of both the left and right channels down to a single channel. We could just take one of the audio channels, going one legged, but you’re missing half the audio. It can be really obvious as well – you only get half the Beatles. Probably George and Ringo knowing our luck.
Anyway, let’s apply a low pass filter to this mono mix. Broadcast FM only has about 15kHz bandwidth for audio. We’re enforcing this with filtering on our transmitter – no point broadcasting audio that won’t be heard.
And on that note, we move onto the RF side of things. Let’s actually get that eyepatch on!
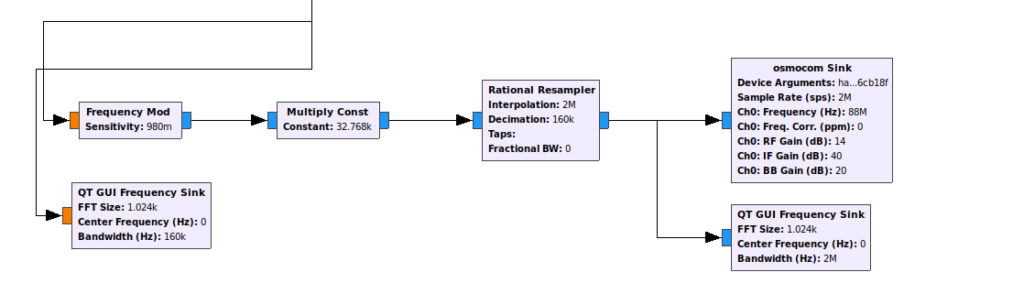
The first step in the RF stage is modulation – actually taking the multiplexed audio signal and generating baseband signal the HackRF One will up convert to the broadcast frequency. GNURadio comes with a Frequency Mod module that does the hard work for us.
If you know anything about broadcast radio, you’ll know we have 75kHz to play with so, what’s that 0.980 value in sensitivity about? Well, the formula for working out what the value should be is:
sensitivity = (2 * pi * max_deviation) / samp_ratePunch out numbers in for 75kHz deviation at a 160kHz and we get approximately 2. Trying that out resulted in a 85kHz deviation – distortion and spread across the spectrum we don’t really want. The 0.89 number appears in documentation from mmbTools and makes for reasonable spectrum occupation.
With the modulation performed, we multiply the real values beteen 1 and -1 we have by 32768 to fill the range of signed 16 bit integers using the Multiply Const stage. This is then re-sampled from the 160kHz used for multiplexing to 2MHz used by HackRF One.
We finally dump the resampled, modulated signal into the HackRF destination. A target frequency is set and amps turned all the way up. We’re ready to transmit.
That said, it’s nice to have an idea of what the transmitter is doing before we turn it on. To do this, we add QT GUI Frequency Sinks to the multiplexed and modulated signals.
Let’s start the stream and hit that go button.
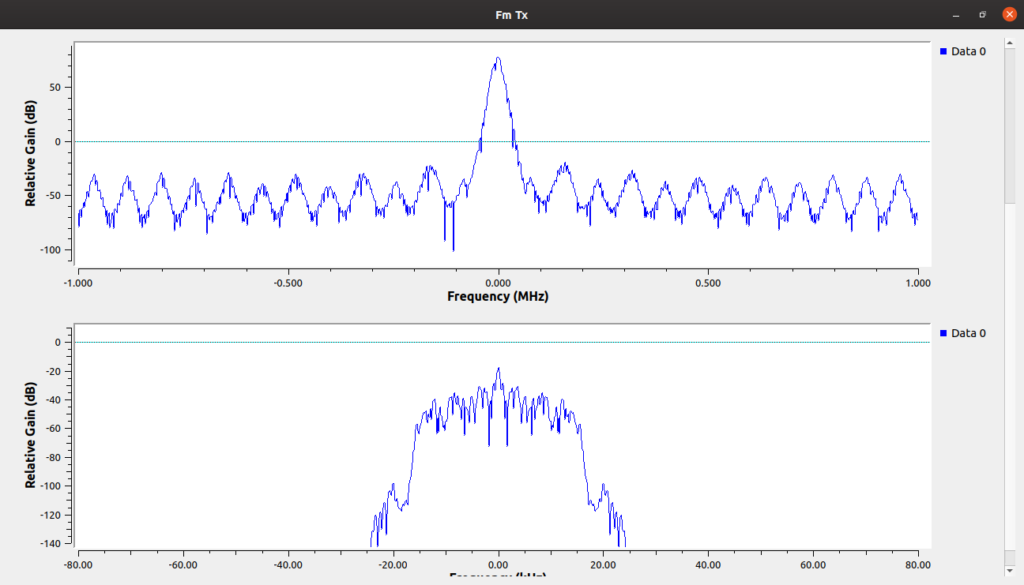
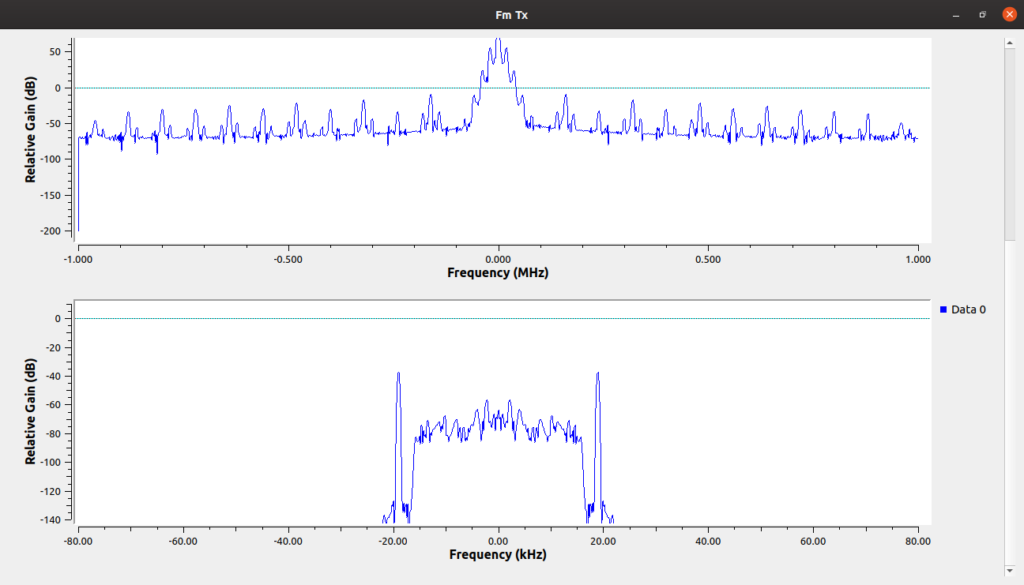
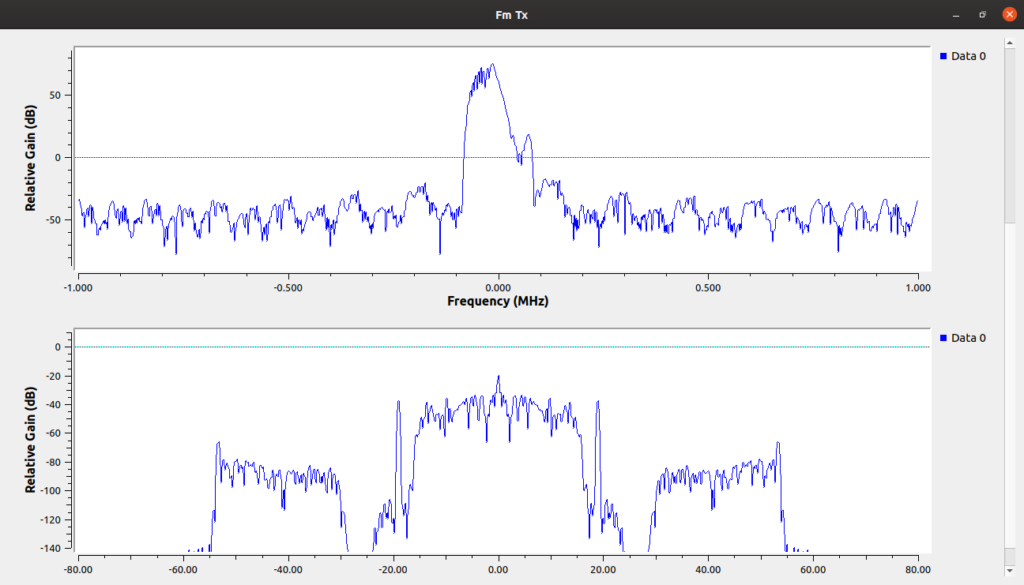
The top graph shows the baseband signal with the single peak that’s characteristic of frequency modulation. Centred on 0Hz, we can see the freqency shift mainly centred below the 75kHz limit. There’s also a bunch of harmonics making appearances down below the noise floor.
The lower graph shows the multiplexed audio we’re feeding into the modulation stage. You can see a definite filtering effect above 15kHz.
With our very old fashioned mono FM transmitter working (no, really, go tune a radio in!), how about we modify it to go modern with stereo. As a side note, the long since closed commercial station I worked for as a presenter launched in mono with stereo service coming later. There are also stations that I’ve observed operating in mono even in recent years for coverage / terrain reasons.
The first step in converting our transmitter to run in stereo is to tell the reciever we’re sending a stereo signal. We do this with a pilot tone. We generate a 19kHz tone that’s added to our mono audio to indicate we’ve got a stereo service. To make it happen, let’s modify the middle stage to multiplex in a tone.
We’ve added a Signal Source generating a 19kHz sine wave at a 160kHz sample rate. It’s kept at a relatively low amplitude (0.08). We simply add it to the mono audio after low pass filtering and we’re ready to go.
Fire up the modified transmitter and our graphs change a bit.
The baseband signal hasn’t really changed but we can now see the obvious 19kHz tone in the audio signal. The peaks look really large here thanks to taking the screenshot at a quiet moment but remains at a constant level.
If you now look at your radio, you may have a stereo lamp appear. If not, we can crank the level up a bit to force it (I’ve added a slider to do this). This isn’t something you’d do in real life but we’ve faked a stereo broadcast as far as the reciever is concerned.
So how do we actually make it stereo? Well, FM broadcast stereo uses a sum and difference model. We’ve got the sum part supplying the mono signal we’re currently transmitting. Multiplex in a difference component and the reciever can recreate the stereo channels.
(L+R) + (L-R) = 2L
(L+R) - (L-R) = 2R
That’s cool but where do we put this difference audio? Well, we frequency shift is up to 38kHz – double the pilot tone frequency. This means the reciever can use the pilot tone as reference.
The model used also mean we have graceful degredation. Remember that pre-emphasis stuff we did for the higher freqency audio to have a better chance of getting to the reciever? Well, the difference audio at 38kHz will be lost before the pilot and finally the mono signal. In the worst case we fall back to a mono service.
In the real world, we’d also have RDS up at 57kHz as well but that’s beyond the scope of this exercise. Though it’s worth remembering it’s there.
On that note, let’s modify our graph one more time to add our difference audio.
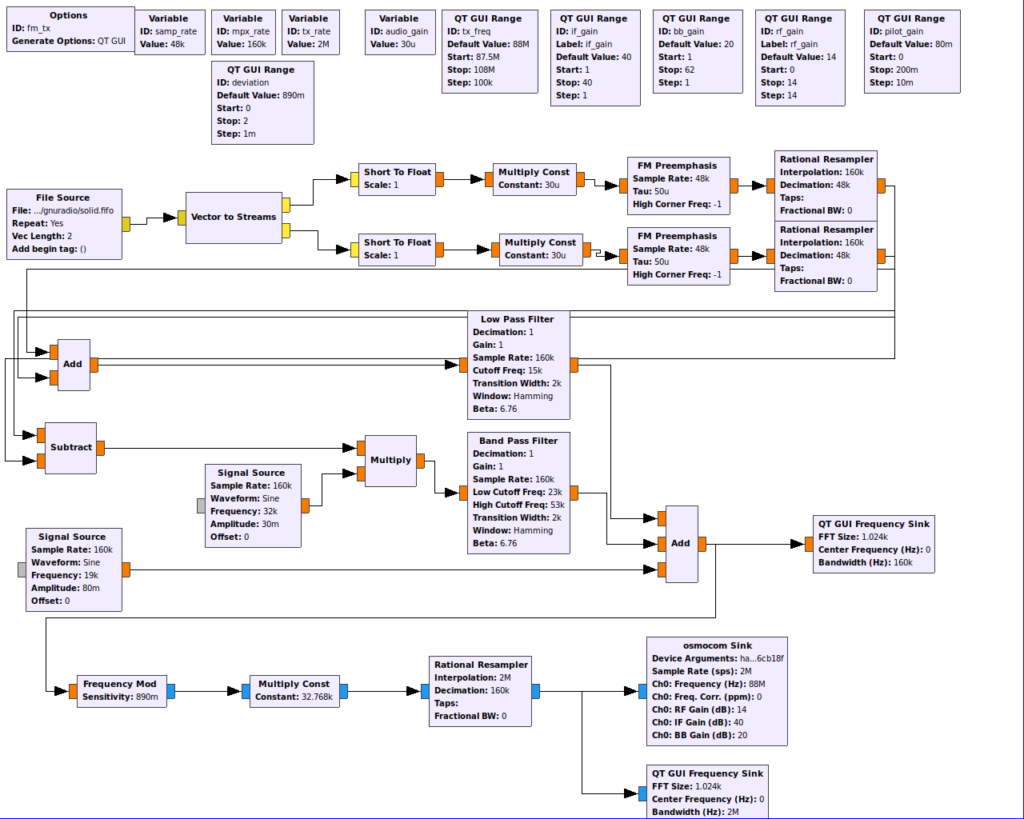
We’ve added a third input to our multiplex mix to slot the difference audio in. To get the audio in the first place, we’ve added a couple more blocks.
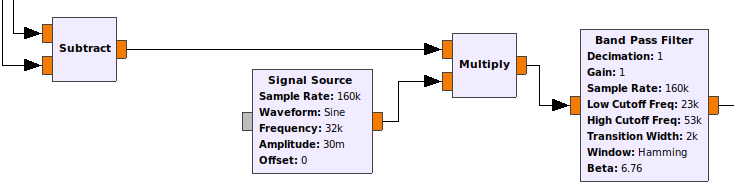
We get our difference by subtracting the left and right channels. In order to shift this audio up 38kHz, a signal source generates a 38kHz sine wave we multiply the difference by. The now shifted difference has a band pass filter applied before joining the multiplex mix.
And that’s it. Fire up the updated graph and we have a stereo transmission.
Our baseband signal doesn’t look any different but we can see the sum, difference and pilot tone making up the multiplexed audio pre-modulation. In the real world, we’d also mix RDS in but we’ve got a functional stereo FM transmitter on a HackRF One.
If you want to take these transmitter configurations for a spin, I’ve attached the GNURadio companion files here.


I built this today with my HackRF, I have a few comments:
1. Stereo offset in text is referred to as 48kHz, rather than 38kHz. Also diagram and .grc file have a 32kHz multiply.
2. Be careful with input signal, verify with an audio sink after the Preemphasis that you are decoding the input into a usable audio stream, my mpg123 command line needed “-o wav” and -e s16 to ensure the correct data type. Also if the stream is not 48kHz you may need to use mpg123’s “–resample” flag to make it correct.
Otherwise works great, although Gqrx WFM Stereo decoder is trash compared to the mono one.
Thanks.
Good spot Sam, I’ve updated the text in the article. The screenshots will take a bit more work to fix.
You’re also right about the input signal. As a debugging tool, audio syncs are brilliant for tagging into various stages of the process.